
Adventures in eLearning
IBOT USER TRAINING
 This one always felt like it was from some strange dream. It had everything. A self-balancing futuristic wheelchair, brilliant inventors, an on-looker car crash, me almost running a person over with a Segway, and a mansion with secret doors and a garage with two helicopters. A new James Bond movie perhaps? Nope, my next training project.
Dean Kamen, who created the Segway, that two-wheeled balancing transporter you see vacationers use on tours, also created a wheelchair using the same gyroscopic balancing technology. He actually created the iBOT first, in collaboration with Independence Technology, and the Segway was born from that technology. The iBOT Wheelchair was and still is revolutionary. And I found myself part of the team responsible for developing the training experience for new iBOT owners.
The iBOT has a straightforward goal of increasing independence. As it self-balances on two wheels it can raise itself to the eye level of someone standing. Being eye level creates greater inclusion with others. The iBOT can also aid in climbing stairs and moving through sand, which allows the occupant to increase their mobility.
NEEDS ASSESSMENT

So why even build this project? Are we just trying to check a requirement box for corporate? Luckily not. While “checking the box” is fairly common, our client wanted to create something that worked well and so they recognized that a training course was going to be beneficial to their users. We wanted to understand the difference between the performance the users should be having and the performance they are having.
Always understand and document the need through an analysis. It allows you to create something that does work instead of something that just looks like it works. It gives us an approach with a reason. Here is what was determined.
DESIGN

Adult Learning Principles
The audience for a project like this age from 30 – 70 (give or take) and so the use of adult learning principles are major keys to the project’s success. Most of the users want to transition to the iBOT from a traditional wheelchair. As we consider adult learning principles, our audience is learning for the sake of learning, they want a reason they are investing in this training. They want to build on their knowledge base. We want them to feel they are adding to what they already know. We know at the point of taking this course they are familiar enough with the iBOT that they understand how it is beneficial to them and how it impacts their way of life. They might not know why they need the training though. They might think they can jump on and go. But we find through the needs assessment that there are hurdles to overcome. So as we design, we have to engage and create interest in taking the training. They will take this training before having an iBOT delivered. So they will have interest and motivation to jump on the iBOT and control it. We can start them off in this project by letting them virtually jump on and start playing. It is the path of least resistance. We wanted to start off with a virtual iBOT and its joystick based controls instead of trying to lecture them on why they should take the training module.
Designing the Experience
I like to start brainstorming experiences that can bring out the material. Based on our needs analysis, we developed an instructional and creative plan focused on delivering an eLearning experience that engages, educates, and prepares. We wanted the audience to leave the training feeling optimistic and confident. This was the opportunity to be more independent and they should be eager to move from the training to using the iBot. So, upon leaving the training, I wanted someone to say, “I have experience,” rather than, “I took a course on it.”
I always like when someone tries something for the first time and at first they are just awful at it. Why shouldn’t they be? But then they try a second time and they aren’t too bad at all. They get this “ah ha!” moment. That is rapid learning and rapid mind building awesomeness.
Designing the Environment
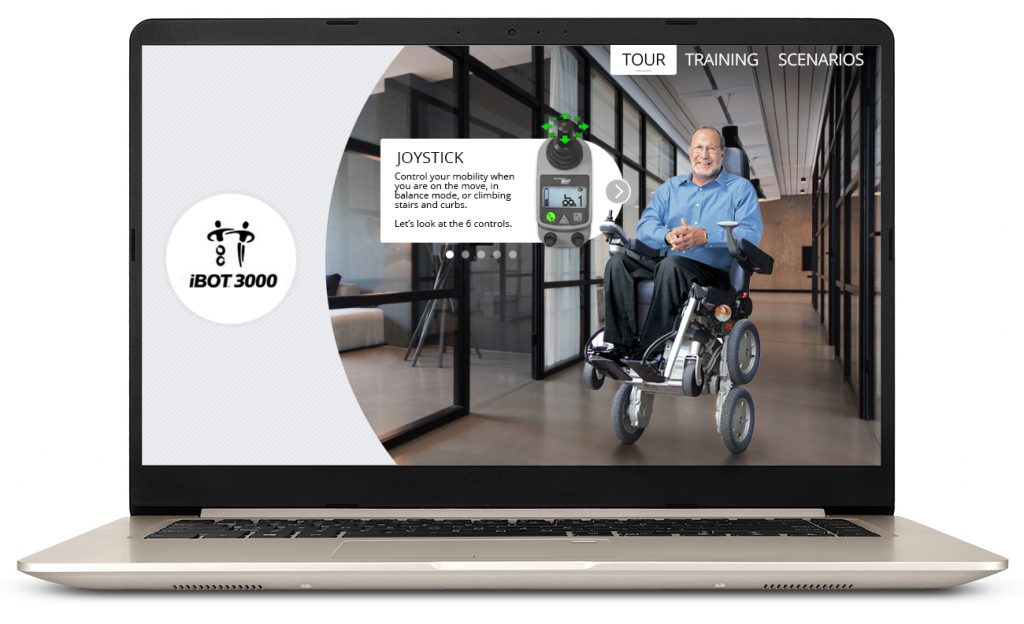
Then I like to play around with the environment. That is the setting everything takes place. It can be at a specific location or no location at all. We could immerse the audience in the environment or use images when beneficial. And what is the style – stylistic or realistic? A bit of both? So what is our environment for this training? We decided that we wanted it fairly realistic. We would build a 3D representation of the iBOT that could be animated as the real iBOT could move and include a virtual joystick in the training so the user could follow instructions, use the joystick and see the iBOT react. The user could “use” the iBOT by themselves, and get used to it, try it out, fail, and try again – with helpful prompts that could lead them if they needed them but wouldn’t be apparent if they weren’t needed. We would have it in different common environments.
Designing the User Interface
As I always say, design is about instructional and creative approaches working together. I wanted the user interface design to use photos of people in the iBOT to make it more inviting and comfortable. Get the user used to them and feeling like they are more common and others are using them. I wanted to carry the iBOT brand through the design and have a nice workflow from section to section. I also wanted to make it an enjoyable experience.
Designing the Storyboard
I worked with the team to define the structure and workflow of the project and through that we created a storyboard that we could populate.
In my notepad, I tend to scribble notes, different approaches to the learning experience, visual ideas, and things I need to get at the store. This is what my notes tend to look like:

TRIP

We gathered questions as we brainstormed ideas and felt it was important for us to be more knowledgeable and comfortable with the iBOT, so we packed our bags and headed to New Hampshire, where the iBOT was invented. Our trip had several goals:
- Get familiar with being around and using the iBOT.
- Take the training currently provided to new users and just as important, learn what not to do with the iBOT.
- Take photos and get video assets so we could build a 3D representation of the iBOT and animate it accordingly.
The first time I sat on the iBOT in balance mode I thought I would fall over and it would kind of Wile E Coyote style fall on top of me, but the iBOT performed perfectly. I was high up, eye level with the team, balancing, hovering in the air like we were told the future would hold. I then began documenting everything we needed. Here are a few notes I had written to myself:
- What is the procedure for transitioning the chair from mode to mode? Don’t forget to record the iBOT movements. Don’t forget the icons and what is lit up or not at any time.
- Ask what decision points when using the chair. Why might someone want to do something different than the procedure? What situations might influence not going from one mode to another? What risk factors should be considered?
- What imagery/video is available from client?
To recreate the chair in 3D, we needed photos and video for textures and reference. Jon, our resident 3D guru, would use these to bring the chair to life in 3D Studio Max, our 3D software of choice.
We recorded videos showing what not to do with the iBOT as well. Don’t turn it off when it is in balancing mode. It will fall over. And it balances so well, you have a 50% chance of falling forward or backward. Also, don’t try and drive one wheel up a curb and the other wheel on level ground. It could cause the chair to fall over. That said, the iBOT worked so well again, that the engineers couldn’t get it to misbehave. In the end, they had to tie a belt around it and pull hard when it went up the curb to show how the iBOT could fall over. Quite a responsive device.
We met Dean Kamen briefly at this time. Have you ever sat in your car and thought to yourself, “If I had a helicopter, I could just fly it to work and skip all this traffic.” Well, Dean Kamen can. He has helicopters at home (two that I saw) and he can land them on top of his office building. I would say that traffic wouldn’t be a problem where we were in New Hampshire, but while we were testing the iBOT out in the DEKA parking lot, a driver who was passing by and seeing this futuristic wheelchair balancing on its own for the first time, smashed right into another car right in front of us. I suppose these traffic accidents can back things up and make helicopters a very handy commodity.
To finalize our trip, we stopped by Dean Kamen’s home, which could be called a number of things – a mansion, a workshop, and a museum come to mind most. Neat place. There we would shoot video of the iBot and take several final photos. Great team there to work with.
All in all, we met our trip objectives.

DEVELOPMENT
It might seem like we haven’t done any development of the training course yet. In reality, I had started to mockup ideas and test functionality before we got back from the trip. By doing a good job understanding the project goals, gathering materials, creating a strong storyboard, and creating an engaging user interface design, development was fairly straightforward. I suppose I can break it down into three simple parts. The three Ds: 1. Design, 2. Develop, and 3. Dessert.
Part1: Design
We talked design already, but until the project is complete, there is always additional design, whether it is instructional or graphical, that continually occurs.
Part 2: Develop
This was a few years back and Macromedia (remember Macromedia?) Flash (remember Flash?) was the best tool for the job. Jon was developing the 3D and providing images that I could play through as the user interacted with the joystick. I programmed everything in Actionscript to make an interactive experience. There was a lot of review and feedback, especially making sure the joystick’s screens and movements were accurate. We also did user testing to make sure this course was adding to the entire iBOT introduction experience.
Part 3: Dessert
Finally, after a long project, it’s great when we can take a step back, have some ice cream, relax, and enjoy the work we have created. We often never get to really see our projects, so never forget to look at it as an outsider as you are finalizing it.

Check out this eLearning adventure:
Connect with me to discuss your eLearning project. Or check out the other areas of my site.